
Blazor 9 introduces a powerful, component-driven architecture that makes it easier than ever to build interactive and modern web applications using .NET. In this tutorial, we’ll walk you through how to personalize your Blazor web app by adding a custom logo and changing the sidebar color to give your app a fresh, branded look.
Table of contents
Whether you’re building an internal tool or a customer-facing solution, making small UI enhancements can go a long way in delivering a professional experience.
Before Customization
Here’s an example of the default layout in a Blazor 9 web app created using the standard template. As you can see, it comes with basic styling and a placeholder sidebar.

Step 1: Add a Logo to Your App
First, choose your logo image and copy it into the wwwroot folder of your Blazor project. This is the root folder where all static assets like images and CSS files are stored.
Update NavMenu.razor
Next, open the NavMenu.razor file and replace the first <div> inside the top row with the following code:
<div class="top-row ps-3 navbar navbar-dark">
    <div class="container-fluid d-flex justify-content-center align-items-center">
        <a class="navbar-brand" href=""></a>
        <img src="logo.jpg" class="logo" />
        <div style="color: white; text-align: center;">CPI Consulting</div>
    </div>
</div>
This code centers the logo and company name in the top navigation bar.
Step 2: Style the Logo with CSS
Open the NavMenu.razor.css file and add the following CSS class to style the logo:
.logo {
    height: 120px;
    width: 120px;
    margin: 0 auto;
    display: block;
    margin-top: 1rem;
    margin-bottom: 1rem;
}
Feel free to adjust the dimensions and margins based on your design preferences.
Step 3: Clean Up Sidebar Styling
To ensure your custom sidebar color appears as expected, remove any conflicting styles. Open the MainLayout.razor.css file and clear out the .sidebar class so it looks like this:
.sidebar {
    /* Cleared styles */
}
This allows the new styling you apply in the next step to take effect without being overridden.
Step 4: Set a Dark Background for the Sidebar
To change the sidebar’s background color to dark, open the MainLayout.razor file and modify the sidebar div like this:
<div class="sidebar bg-dark">The bg-dark class uses Bootstrap’s built-in dark background styling. You can also define a custom background color using inline styles or custom CSS if you prefer a different shade.
Optional: Customize Home Page Text
To personalize your application even more, you can edit the content on the Home.razor page to reflect your branding, such as a custom welcome message or product description.
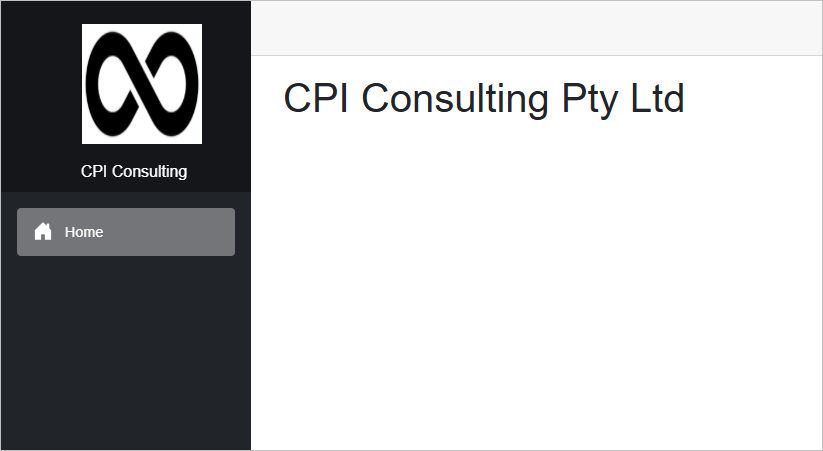
Final Result
After applying all these changes, your Blazor 9 web app will have a clean, branded sidebar and logo in the top navigation. Here’s what the updated layout looks like:
Conclusion
Customizing your Blazor application’s UI is a great way to align your project with your brand identity. With just a few changes to HTML and CSS, you can significantly improve the look and feel of your app. Stay tuned for more Blazor tips and UI enhancement guides!
Please visit our YouTube channel
Discover more from CPI Consulting Pty Ltd Experts in Cloud, AI and Cybersecurity
Subscribe to get the latest posts sent to your email.